Day 14
Today
- Text Mining show
- Model-View-Controller pattern example
- Git: commit messages, merge conflicts, branches (oh my)
Reading Journal Debrief
Since you’ll be working with a partner on MP4, good Git habits are all the more important. As you first start working together, you should discuss some team ground rules and expectations, including version control practices.
Model-View-Controller (MVC)
Model-View-Controller is what is known as a software design pattern.
In software engineering, a design pattern is a general reusable solution to a commonly occurring problem within a given context in software design. A design pattern is not a finished design that can be transformed directly into source or machine code. It is a description or template for how to solve a problem that can be used in many different situations. Patterns are formalized best practices that the programmer can use to solve common problems when designing an application or system.
-- Wikipedia article on Software Design Pattern
The Model-View-Controller design pattern (or MVC for short) is an extremely useful design pattern for a number of applications. The most common places that it shows up are graphical user interfaces and web applications. Most importantly it is ideally suited to the projects that you all will be doing for this mini-project. Here is a figure that shows the basic principles of the MVC design pattern.

- A controller can send commands to the model to update the model’s state (e.g. editing a document). It can also send commands to its associated view to change the view’s presentation of the model (e.g. by scrolling through a document).
- A model stores data that is retrieved according to commands from the controller and displayed in the view.
A view generates an output presentation to the user based on changes in the model.
-- Wikipedia article on Model View Controller
This decomposition has a number of extremely nice properties. At the highest level, the pattern allows for the writing of loosely coupled and highly modular code. This allows various components to be swapped out with minimal changes to the overall program. However, in order to see the full power of MVC, it helps to go through one cycle of using it to solve a problem.
Brick Breaker
In order to better understand the MVC design pattern, we’re going to collaboratively build a game based on this pattern. Specifically, we’re going to be building out the basic structure of the popular Brick Breaker game.
While we’re going through this exercise it will be helpful to have a look at the pygame cheat sheet. It will also be useful to keep in mind the coordinate system used to draw to the Pygame screen.
If you don’t have pygame installed yet, you can install it with the following command.
$ pip install pygame
You can follow along with the code live, or use the BrickBreakerMVC, which already has each of the iterations of the code that we’re going to go through together.
A Basic Run Loop
We’ll start with some skeleton code that defines a minimal program which uses pygame to initialize a 640 by 480 pixel screen, and then waits until the user hits the “x” button in the window before quitting. We won’t be coding this part live, but we will be going over the basic components of the implementation.
This version of the code can be found at the iteration 1 commit.
Starting Our Model Class
Next, we’ll create a model class that maintains a single brick.
This version of the code can be found at the iteration 2 commit.
Starting Our View Class
Next, we’ll create a view class that draws our model to the pygame window.
This version of the code can be found at the iteration 3 commit.
Making More Bricks and Adding a Paddle
Next, we’ll add a grid of bricks along with a paddle. The paddle will wind up moving which will mean we need to create an update function to handle our game physics.
This version of the code can be found at the iteration 4 commit.
Adding a Keyboard Controller
Let’s add a controller to our system. We’ll start by coding a controller that uses the left and right arrow keys to decrease and increase, respectively, the velocity of the paddle.
This version of the code can be found at the iteration 5 commit.
Swapping in a Mouse Controller
We now create a mouse controller, which has the paddle trail the position of the mouse in the PyGame window. Once we have the controller implemented, we can easily swap in the mouse controller for our keyboard controller.
This version of the code can be found at the iteration 6 commit.
Git merge conflicts
Since you’ll soon have more than one person working on code at the same time, you may encounter a situation where each of you have made modifications to the same file. When this happens, you need to go through a process to decide how to blend these changes together into a single new version. Read about resolving merge conflicts.
Exercise: resolving merge conflicts
Let’s create a merge conflict so we can practice resolving it.
Follow along with these commands and try it yourself.
We’re going to do everything locally, but you can imagine that repo1 and repo2 belong to you and your partner on separate machines - everything works the same way.
# Create new Git repository and commit a file
$ mkdir repo1
$ cd repo1/
$ git init
$ echo -e "Knock knock\nWho's there?" > joke.txt
$ git add joke.txt
$ git commit -m "Add joke setup"

# Clone the repo (simulating a partner)
$ cd ..
$ git clone repo1/ repo2
$ cd repo2

# Make a change in both repos simultaneously (merge conflict)
$ cd ../repo1/
$ echo "Interrupting cow" >> joke.txt
$ git commit -a -m "Cows are always funny"
$ cd ../repo2/
$ echo "Banana" >> joke.txt
$ git commit -a -m "Fruit-based jokes are the best"
So now we’ve got a merge conflict brewing. Two copies of the repository started from the same commit (the joke setup) but made diverging changes. Let’s see what that looks like, and how to resolve it:
# From within repo2:
$ git pull origin master
remote: Counting objects: 3, done.
remote: Total 3 (delta 0), reused 0 (delta 0)
Unpacking objects: 100% (3/3), done.
From /home/ben/merge_example/repo1
 * branch            master     -> FETCH_HEAD
   b056309..2d02106  master     -> origin/master
Auto-merging joke.txt
CONFLICT (content): Merge conflict in joke.txt
Automatic merge failed; fix conflicts and then commit the result.
Here Git is attempting to merge the two repository contents automatically for you. Many times it can do so successfully (e.g. if you have each changed different files, it will merge by creating a commit that has both of your changes). But in this case, we’ve edited the same part of the same file, so a choice must be made by a human about what should stay and what should go.
At this point, the contents of joke.txt in repo2 look like this:
Knock knock
Who's there?
<<<<<<< HEAD
Banana
=======
Interrupting cow
>>>>>>> 2d0210609e38d9f38bb48d8a77fbf57c3d05d15c
Git has inserted these markers around the two choices that need to be resolved.
We fix the merge conflict by choosing one of the options, removing the other option and the marker lines (<<..., ==..., and >>...), and then committing the file.
You can use any text editor you like to do this, but Atom is particularly nice since it is aware of how git works (you can actually do everything including writing commit messages within Atom, feel free to explore on your own). If you open the conflicted file in Atom, it presents you with buttons like this:
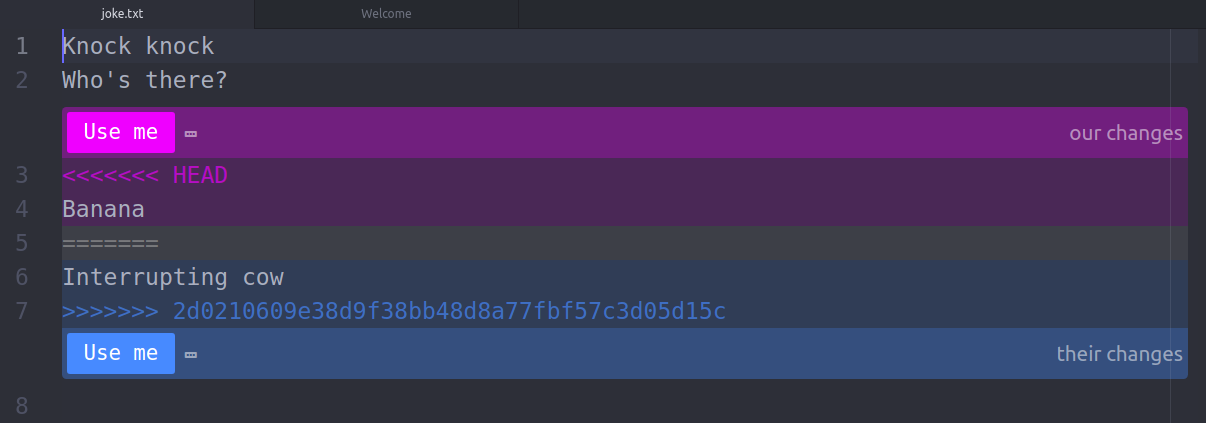
Clicking one of them automatically performs the edits described above. With those changes made and saved, the last step is to commit the merge:
$ git add joke.txt
$ git commit -m "Resolved merge conflict (cows rule)"
At this point the merge conflict is resolved in repo2. In your actual workflow you would then want to push the merge resolution commit to a shared location, so that repo1 can pull it and both partners can work from a common history again.
So: merge conflicts are nothing to be afraid of, but they certainly are annoying. Some concrete suggestions for avoiding merge conflicts
- Pull first before you start each work session, to make sure you have the latest version of everyone’s work to build on.
- Avoid working on same file (and especially the same section of a file) simultaneously. Organizing your code into modules as we read about in Chapter 14.9 can help with this.
- Commit/push/pull updates frequently, so there’s less opportunity for major divergence.
Going Beyond: Git branches
What is the “master” in git push origin master? It’s the name of a branch!
Developers often use branches to work on a new feature (without halting ongoing development on the master branch). Then once the feature is complete and tested, they can merge it back into master.
To see this visually, work through the first three levels of “Learn Git Branching”